No edit summary Tag: sourceedit |
No edit summary |
||
| (17 intermediate revisions by 2 users not shown) | |||
| Line 1: | Line 1: | ||
{{Template:Top Navi|Ice Block Trap|Pendulum Trap}} |
{{Template:Top Navi|Ice Block Trap|Pendulum Trap}} |
||
| + | {{Infobox Trap |
||
| − | {{Infobox Trap|Image = Hoffman IV.jpg|Appearances = ''[[Saw IV]]''|Type = Test|Victims = [[Mark Hoffman]] (deceased)|Creator = [[John Kramer]]}} |
||
| + | |Image = Hoffman IV.jpg |
||
| − | '''Hoffman's Test '''was apart of [[John's new plans]]. |
||
| + | |Appearances = ''[[Saw IV]]'', ''[[Saw VI|VI]]'', ''[[Saw 3D|3D]]'' |
||
| + | |Type = Test<br>Standard Trap |
||
| + | |Victims = [[Mark Hoffman]] (survived) |
||
| + | |Creator = [[John Kramer]]<br>[[Jill Tuck]]}} |
||
| + | {{Quote|You feel you now have control, don't you? You think you will walk away untested.|John's warning for Mark Hoffman|Saw IV}} |
||
| + | '''Hoffman's Test''' is one of [[John Kramer|Jigsaw's]] [[:Category:Traps|games]] in the [[Saw (franchise)|''Saw'' franchise]], occurring over the course of ''[[Saw IV]]'' to ''[[Saw VI]]''. |
||
| + | ==History== |
||
| − | A wax-coated tape in [[Jigsaw]] (John's) stomach was found during his autopsy in ''[[Saw IV]]''. At first, it was thought to be a message that taunted the authorities, but as the movie progressed, it was revealed that John had a second apprentice, aside from [[Amanda Young|Amanda]]. |
||
| + | ===Message from the Grave=== |
||
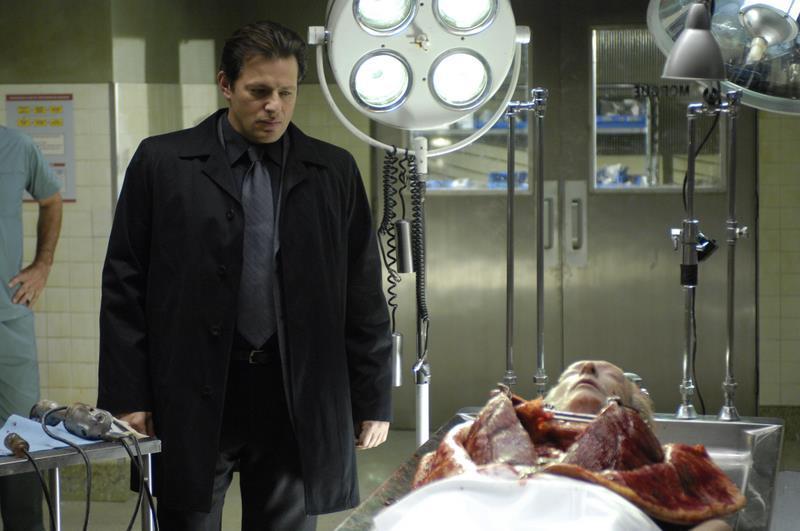
| ⚫ | {{Quote|Are you there, Detective? If so, you are probably the last man standing. Now, perhaps you will succeed where the others have failed. You feel you now have control, don't you? You think you will walk away untested. I promise that my work will continue. That I have ensured. By hearing this tape, some will assume that this is over, but I am still among you. You think it's over just because I am dead? It's not over. The games have just begun.|Mark Hoffman's tape|Saw IV}}[[File:John_and_Hoffman.jpg|thumb|left|250px|Hoffman at the morgue]] |
||
| + | Following the [[Jeff's Final Test|death]] of [[John Kramer]], better known as the Jigsaw Killer, at the hands of [[Jeff Denlon]], one of his victims, his corpse was taken to the [[Police Station|morgue]] where he was obduced by [[Adam Heffner|Dr. Adam Heffner]]. Upon the autopsy of John's body, Heffner found a wax-coated [[Instruction Tapes|audio tape]] in his stomach and therefore ordered his colleague to call for the homicide division. Shortly afterwards, [[Mark Hoffman|Detective Mark Hoffman]], who was in fact John's apprentice and eventual successor, arrived at the morgue and ordered the pathologists to cut the tape from the wax. After doing so, they gave the tape to Hoffman. The recording contained a message for him, which warned him that the games had just begun and that he wouldn't get away untested. (''[[Saw III]]'', ''[[Saw IV|IV]]'') |
||
| + | ===[[Jill's Box|The Box]]=== |
||
| − | The second apprentice was revealed to be [[Mark Hoffman]] when the film neared its conclusion, and the tape found in John's stomach was meant for him. It stated that although he may be the "last man standing," he would not walk away untested, and that "the games have just begun," hinting that the tape was a prelude to his testing. |
||
| + | [[File:Jillbox.jpg|thumb|200px|Jill opens the box]] |
||
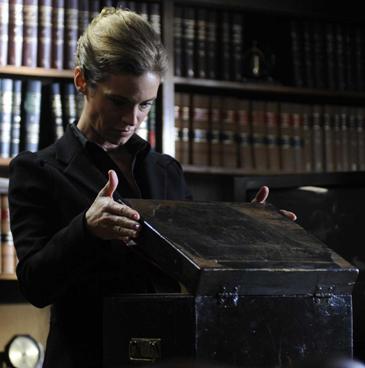
| + | After John's death, his ex-wife, [[Jill Tuck]], received a call from John's executor, [[Bernie Feldman]], who arranged an appointment with her. Shortly afterwards, Jill visited him in his [[Bernie Feldman's Chancery|chancery]]. Upon entering his office, Feldman told her to take a seat. When she asked her for the reason of his call, he told her that he was John's executor and thereby voiced his surprise of the revelation of John's true identity. Afterwards, he opened the envelope given to him by John, which contained a video tape. This tape was made by John before his death. In his video, he apologized to Jill for the death of their unborn son, [[Gideon Kramer|Gideon]], who died during a miscarriage when [[Cecil Adams]], one of Jill's former patients, robbed her at the [[Homeward Bound Clinic]]. John deemed himself partly responsible for this tragic incident due to his support of her work at the clinic. He also told her that he still loved her and would always do so. Finally, he told her about the box, saying that its contents were of grave importance. Despite their disagreements on his methods and moral beliefs, he claimed to fully trust her that she would know what to do with the things in the box. As the video ended, Feldman finally handed her the box and put it on a table. Jill took off her necklace, which had a [[Jill's Key|key]] attached to it. John had given this key to her during their final conversations on the day of his death. Upon unlocking and opening the box, she was shocked to see that it contained one of John's traps, a [[Reverse Beartrap]]. Furthermore, the box contained numerous envelopes. When Feldman curiously asked her what was in the box, she closed its lid, thanked Feldman for his call and then left his office with the box. (''[[Saw III]]'', ''[[Saw IV|IV]]'', ''[[Saw V|V]]'') |
||
| + | ===[[Amanda's Letter]]=== |
||
| ⚫ | |||
| + | A few days later, Hoffman went to Jill's clinic to collect the envelopes as they contained the [[Stalker Photos|photos]] of the test subjects of the next [[William's Trial|game]], which focused on [[William Easton]], manager of the [[Umbrella Health|Umbrella Health insurance company]], and his colleagues. Jill gave the five envelopes to him, thereby concealing the existence of a sixth one, which contained a photo of Hoffman for his own test. |
||
| + | |||
| + | [[File:JillPamela.png|thumb|left|240px|Pamela shows the letter to Jill]] |
||
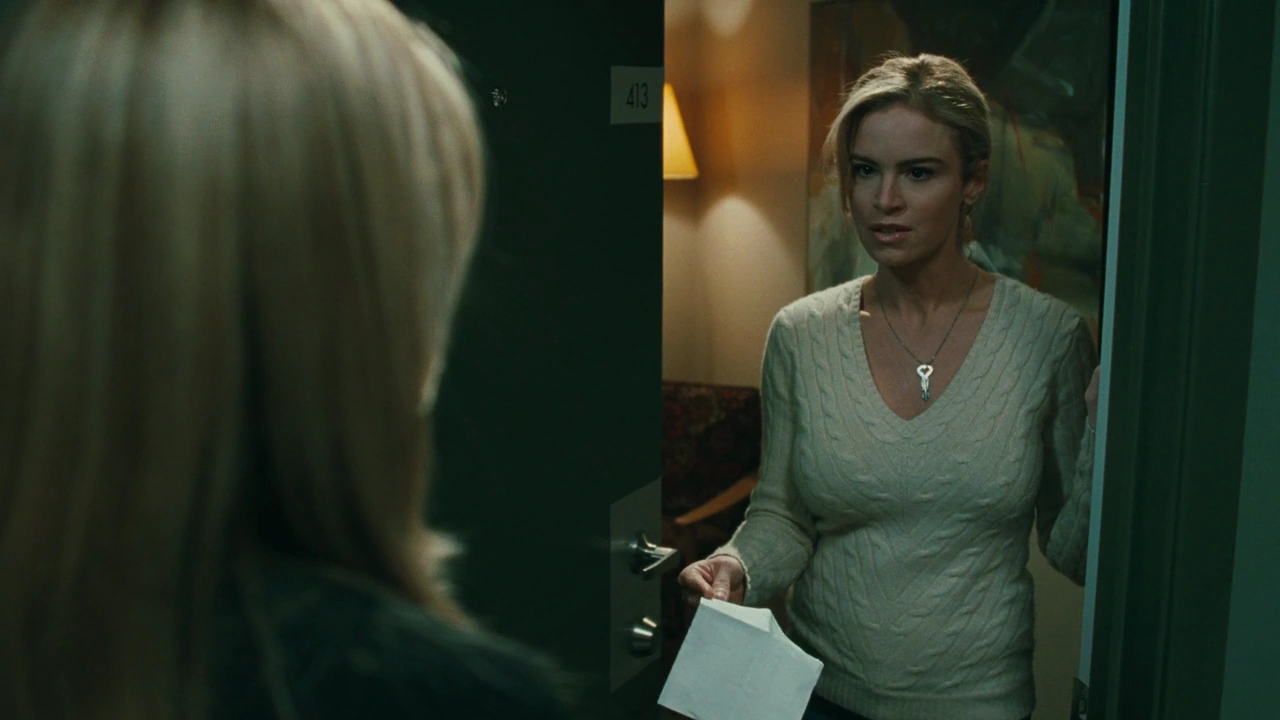
| + | Later that day, when she was back home, she heard someone knocking at the door of her [[Jill Tuck's Apartment|apartment]]. Upon opening it, she was annoyed to see that it was [[Pamela Jenkins]], a sensational journalist investigating the Jigsaw Case, who had received the address from Detective Hoffman. Pamela showed her a copy of a [[Amanda's Letter|letter]] which had been found at the scene of John's death and asked Jill if she understood the meaning of this message. Jill denied this and told her to go. Unsatisfied with her visit, Pamela slid the letter under the door, telling her to call back if she changed her opinion. In fact, Jill was shocked to see the letter as it was actually a blackmailing letter written by Hoffman to [[Amanda Young (Movies)|Amanda Young]], John's other apprentice, on the day of her and John's death. In the letter, he had told Amanda that he knew that she had been with Cecil at the night of the robbery which had caused Gideon's death. Therefore, he threatened her to tell John the truth. To prevent him from doing so, he forced her to kill one of their test subjects, [[Lynn Denlon|Dr. Lynn Denlon]]. (''[[Saw VI]]'') |
||
| + | |||
| + | ===Culmination=== |
||
| + | Shortly afterwards, Jill put the remaining contents of the box into a bag and then drove to the abandoned [[Rowan Zoological Institute]], where Hoffman had set up William Easton's game. When she entered his surveillance room, she saw that the game was still going on. Through the big one-way mirrors in the room, she saw Pamela and two other people, [[Tara Abbott|Tara]] and [[Brent Abbott]], imprisoned in separate animal enclosures. As the game quickly approached its end, Jill anticipated that Hoffman would arrive soon. Therefore, she put her bag in a locker and then placed the letter in front of Hoffman's surveillance monitors before going into hiding. |
||
| + | |||
| + | Moments later, Hoffman arrived and entered the room, mere seconds before the end of William's game. When he approached the monitors, he was shocked when he noticed the letter. Moments after he sat down on his chair and read the letter, Jill Tuck suddenly entered the room and incapacitated him with an electric shock. While he was unconscious, she strapped him onto the chair and put the Reverse Beartrap on his head. |
||
| + | |||
| + | [[File:HoffmanInRBT.png|thumb|250px|Jill shows the photo to Hoffman]] |
||
| + | When he woke up shortly afterwards, he was immediately frightened by the situation. Jill then approached him and showed him a photo of himself, revealing that the black box left to her by John had contained a sixth envelope, as John's final request for Jill was to test Hoffman. Before she finally activated the trap, they watched the [[Acid Room|final part]] of William's game through the one-way-mirrors and were disgusted when William was injected and dissolved by hydrofluoric acid, after Brent Abbott had chosen to avenge his [[Harold Abbott|father]], one of William's former clients, by activating a trap positioned above William. When William died, the time for Hoffman's test had come as well. However as Jill was angered by the letter, she refused to give Hoffman any chance to survive and therefore had no key for him to escape the trap. |
||
| + | |||
| + | [[File:Hoffman's Jaw Breaks.png|thumb|left|200px|Hoffman, after escaping the trap]] |
||
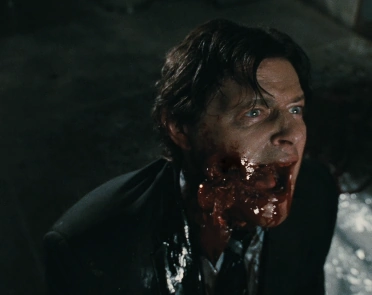
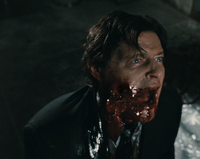
| + | When the timer of the trap started to count down Jill eventually left the room with the words "[[Game Over]]". Hoffman immediately panicked and furiously smashed his left hand with the frontal part of the trap in order to free himself from his restraints. He then tried to open the trap with a screwdriver. When this attempt remained unsuccessful and only a few seconds were left, Hoffman pushed the trap's frontal part between two metal bars on the door window to prevent it from bursting open completely. Eventually, he managed to pull his head out of the trap, but was heavily injured in the process as the trap had torn his right cheek apart. (''[[Saw VI]]'') |
||
| + | |||
| + | ===Aftermath=== |
||
| + | As she had noticed his escape, Jill panicked and ran away. However, when she saw Hoffman's shadow at the end of a hallway, she quickly went into hiding behind a cloak hanger with a few overalls granting her cover. While she watched him from her hiding spot, Hoffman used a bunch of paper towels as an improvised bandage for his hand, which he had broken to free himself from the electric chair, and took another one to stop the bleed from his cheek. Afterwards, he picked up the Reverse Beartrap again and finally left the zoo once and for all. When she was alone and believed to be safe, Jill also left her hiding spot and left the zoo. (''[[Saw 3D]]'') |
||
| + | |||
| + | ==Navigation== |
||
| + | {{NavTraps}} |
||
[[Category:Traps]] |
[[Category:Traps]] |
||
[[Category:Saw IV Traps]] |
[[Category:Saw IV Traps]] |
||
[[Category:Tests]] |
[[Category:Tests]] |
||
| + | [[Category:Standard Traps]] |
||
| + | [[Category:John Kramer's Traps]] |
||
| + | [[Category:Jill Tuck's Traps]] |
||
Revision as of 15:01, 13 February 2020
| ◄ | Ice Block Trap | Hoffman's Test | Pendulum Trap | ► |
| “ | You feel you now have control, don't you? You think you will walk away untested. | ” |
— John's warning for Mark Hoffman[src]
| ||
Hoffman's Test is one of Jigsaw's games in the Saw franchise, occurring over the course of Saw IV to Saw VI.
History
Message from the Grave
| “ | Are you there, Detective? If so, you are probably the last man standing. Now, perhaps you will succeed where the others have failed. You feel you now have control, don't you? You think you will walk away untested. I promise that my work will continue. That I have ensured. By hearing this tape, some will assume that this is over, but I am still among you. You think it's over just because I am dead? It's not over. The games have just begun. | ” |
— Mark Hoffman's tape[src]
| ||
Hoffman at the morgue
Following the death of John Kramer, better known as the Jigsaw Killer, at the hands of Jeff Denlon, one of his victims, his corpse was taken to the morgue where he was obduced by Dr. Adam Heffner. Upon the autopsy of John's body, Heffner found a wax-coated audio tape in his stomach and therefore ordered his colleague to call for the homicide division. Shortly afterwards, Detective Mark Hoffman, who was in fact John's apprentice and eventual successor, arrived at the morgue and ordered the pathologists to cut the tape from the wax. After doing so, they gave the tape to Hoffman. The recording contained a message for him, which warned him that the games had just begun and that he wouldn't get away untested. (Saw III, IV)
The Box
Jill opens the box
After John's death, his ex-wife, Jill Tuck, received a call from John's executor, Bernie Feldman, who arranged an appointment with her. Shortly afterwards, Jill visited him in his chancery. Upon entering his office, Feldman told her to take a seat. When she asked her for the reason of his call, he told her that he was John's executor and thereby voiced his surprise of the revelation of John's true identity. Afterwards, he opened the envelope given to him by John, which contained a video tape. This tape was made by John before his death. In his video, he apologized to Jill for the death of their unborn son, Gideon, who died during a miscarriage when Cecil Adams, one of Jill's former patients, robbed her at the Homeward Bound Clinic. John deemed himself partly responsible for this tragic incident due to his support of her work at the clinic. He also told her that he still loved her and would always do so. Finally, he told her about the box, saying that its contents were of grave importance. Despite their disagreements on his methods and moral beliefs, he claimed to fully trust her that she would know what to do with the things in the box. As the video ended, Feldman finally handed her the box and put it on a table. Jill took off her necklace, which had a key attached to it. John had given this key to her during their final conversations on the day of his death. Upon unlocking and opening the box, she was shocked to see that it contained one of John's traps, a Reverse Beartrap. Furthermore, the box contained numerous envelopes. When Feldman curiously asked her what was in the box, she closed its lid, thanked Feldman for his call and then left his office with the box. (Saw III, IV, V)
Amanda's Letter
A few days later, Hoffman went to Jill's clinic to collect the envelopes as they contained the photos of the test subjects of the next game, which focused on William Easton, manager of the Umbrella Health insurance company, and his colleagues. Jill gave the five envelopes to him, thereby concealing the existence of a sixth one, which contained a photo of Hoffman for his own test.
Pamela shows the letter to Jill
Later that day, when she was back home, she heard someone knocking at the door of her apartment. Upon opening it, she was annoyed to see that it was Pamela Jenkins, a sensational journalist investigating the Jigsaw Case, who had received the address from Detective Hoffman. Pamela showed her a copy of a letter which had been found at the scene of John's death and asked Jill if she understood the meaning of this message. Jill denied this and told her to go. Unsatisfied with her visit, Pamela slid the letter under the door, telling her to call back if she changed her opinion. In fact, Jill was shocked to see the letter as it was actually a blackmailing letter written by Hoffman to Amanda Young, John's other apprentice, on the day of her and John's death. In the letter, he had told Amanda that he knew that she had been with Cecil at the night of the robbery which had caused Gideon's death. Therefore, he threatened her to tell John the truth. To prevent him from doing so, he forced her to kill one of their test subjects, Dr. Lynn Denlon. (Saw VI)
Culmination
Shortly afterwards, Jill put the remaining contents of the box into a bag and then drove to the abandoned Rowan Zoological Institute, where Hoffman had set up William Easton's game. When she entered his surveillance room, she saw that the game was still going on. Through the big one-way mirrors in the room, she saw Pamela and two other people, Tara and Brent Abbott, imprisoned in separate animal enclosures. As the game quickly approached its end, Jill anticipated that Hoffman would arrive soon. Therefore, she put her bag in a locker and then placed the letter in front of Hoffman's surveillance monitors before going into hiding.
Moments later, Hoffman arrived and entered the room, mere seconds before the end of William's game. When he approached the monitors, he was shocked when he noticed the letter. Moments after he sat down on his chair and read the letter, Jill Tuck suddenly entered the room and incapacitated him with an electric shock. While he was unconscious, she strapped him onto the chair and put the Reverse Beartrap on his head.


Jill shows the photo to Hoffman
When he woke up shortly afterwards, he was immediately frightened by the situation. Jill then approached him and showed him a photo of himself, revealing that the black box left to her by John had contained a sixth envelope, as John's final request for Jill was to test Hoffman. Before she finally activated the trap, they watched the final part of William's game through the one-way-mirrors and were disgusted when William was injected and dissolved by hydrofluoric acid, after Brent Abbott had chosen to avenge his father, one of William's former clients, by activating a trap positioned above William. When William died, the time for Hoffman's test had come as well. However as Jill was angered by the letter, she refused to give Hoffman any chance to survive and therefore had no key for him to escape the trap.
Hoffman, after escaping the trap
When the timer of the trap started to count down Jill eventually left the room with the words "Game Over". Hoffman immediately panicked and furiously smashed his left hand with the frontal part of the trap in order to free himself from his restraints. He then tried to open the trap with a screwdriver. When this attempt remained unsuccessful and only a few seconds were left, Hoffman pushed the trap's frontal part between two metal bars on the door window to prevent it from bursting open completely. Eventually, he managed to pull his head out of the trap, but was heavily injured in the process as the trap had torn his right cheek apart. (Saw VI)
Aftermath
As she had noticed his escape, Jill panicked and ran away. However, when she saw Hoffman's shadow at the end of a hallway, she quickly went into hiding behind a cloak hanger with a few overalls granting her cover. While she watched him from her hiding spot, Hoffman used a bunch of paper towels as an improvised bandage for his hand, which he had broken to free himself from the electric chair, and took another one to stop the bleed from his cheek. Afterwards, he picked up the Reverse Beartrap again and finally left the zoo once and for all. When she was alone and believed to be safe, Jill also left her hiding spot and left the zoo. (Saw 3D)