m (Protected "Flammable Jelly" ([edit=autoconfirmed] (indefinite) [move=autoconfirmed] (indefinite))) |
No edit summary Tag: Visual edit |
||
| (3 intermediate revisions by 3 users not shown) | |||
| Line 6: | Line 6: | ||
|Victims = [[Mark Wilson]] (failed) |
|Victims = [[Mark Wilson]] (failed) |
||
|Type = Standard Trap |
|Type = Standard Trap |
||
| − | |Creator = [[John Kramer]]<br>[[Mark Hoffman]]}} |
+ | |Creator = [[John Kramer]]<br>[[Mark Hoffman]]|AKA = Candle Trap}} |
{{Quote|Let's put your so called illness to the test.|Jigsaw's tape for Mark Wilson|Saw}}The '''Flammable Jelly''' is a [[:Category:Traps|trap]] from the [[Saw (franchise)|''Saw'' franchise]], appearing in the first ''[[Saw]]'' film. |
{{Quote|Let's put your so called illness to the test.|Jigsaw's tape for Mark Wilson|Saw}}The '''Flammable Jelly''' is a [[:Category:Traps|trap]] from the [[Saw (franchise)|''Saw'' franchise]], appearing in the first ''[[Saw]]'' film. |
||
==Design and Function== |
==Design and Function== |
||
| − | This game took place in a dark room, only lightened by a small candle. The victim was completely naked and had a flammable substance smeared on |
+ | This game took place in a dark room, only lightened by a small candle. The victim was completely naked and had a flammable substance smeared on their body, as well as a slow-acting poison coursing through their bloodstream. The only antidote was hidden inside a heavy safe in the middle of the room. In order to open it, the victim had to find the right combination among hundreds of numbers written all over the walls. Due to the darkness, the victim was forced to take the candle and walk to the walls to be able to see the numbers, while the entire floor of the room was covered in glass shards. (''[[Saw]]'') |
==History== |
==History== |
||
| Line 16: | Line 16: | ||
{{Quote|Hello, Mark. If you're so sick, then why do I have so many photos of you up and about? Let's put your so called illness to the test. Right now there is a slow acting poison in your veins. The antidote is inside the safe. The combination to the safe is written on the walls. Hurry up and program it in, but watch your step. And by the way, that's a flammable substance smeared on your body, so I would be careful with that candle if I were you, or all the people you've burned with your act just might have their revenge.|Mark Wilson's tape|Saw}} |
{{Quote|Hello, Mark. If you're so sick, then why do I have so many photos of you up and about? Let's put your so called illness to the test. Right now there is a slow acting poison in your veins. The antidote is inside the safe. The combination to the safe is written on the walls. Hurry up and program it in, but watch your step. And by the way, that's a flammable substance smeared on your body, so I would be careful with that candle if I were you, or all the people you've burned with your act just might have their revenge.|Mark Wilson's tape|Saw}} |
||
[[File:MarkJelly.png|thumb|250px|Mark awakes in his trap]] |
[[File:MarkJelly.png|thumb|250px|Mark awakes in his trap]] |
||
| − | The victim of this trap was [[Mark Wilson]], a man who had defrauded |
+ | The victim of this trap was [[Mark Wilson]], a man who had defrauded his health insurance company of money by claiming he was seriously ill, even though he actually wasn't. Therefore, he was targeted by [[John Kramer]], better known as the Jigsaw Killer, and his accomplice, [[Mark Hoffman|Detective Mark Hoffman]], who abducted him and took him to a pitch-dark room. When he woke up, Mark found himself completely naked in a dark room only lightened by a single candle. An [[Instruction Tapes|audio tape]] left for him by Hoffman told him about a slow-acting poison in his body. The antidote for said poison was inside a safe right before him. However, in order to open it, he had to find the combination among hundreds of numbers written all over the walls. Due to the darkness, Mark had to take the candle with him and was forced to walk to the walls, while the entire floor of the room was covered in glass shards. Additionally, he had a flammable substance smeared on his body. Mark tried to find the combination in time before the poison could kill him, but thereby accidentally ignited the substance, causing him to burn alive. At the same time, Hoffman was witnessed his game through a [[Peepholes|peephole]] in the wall. (''[[Saw]]'', ''[[Saw V|V]]'') |
===Aftermath=== |
===Aftermath=== |
||
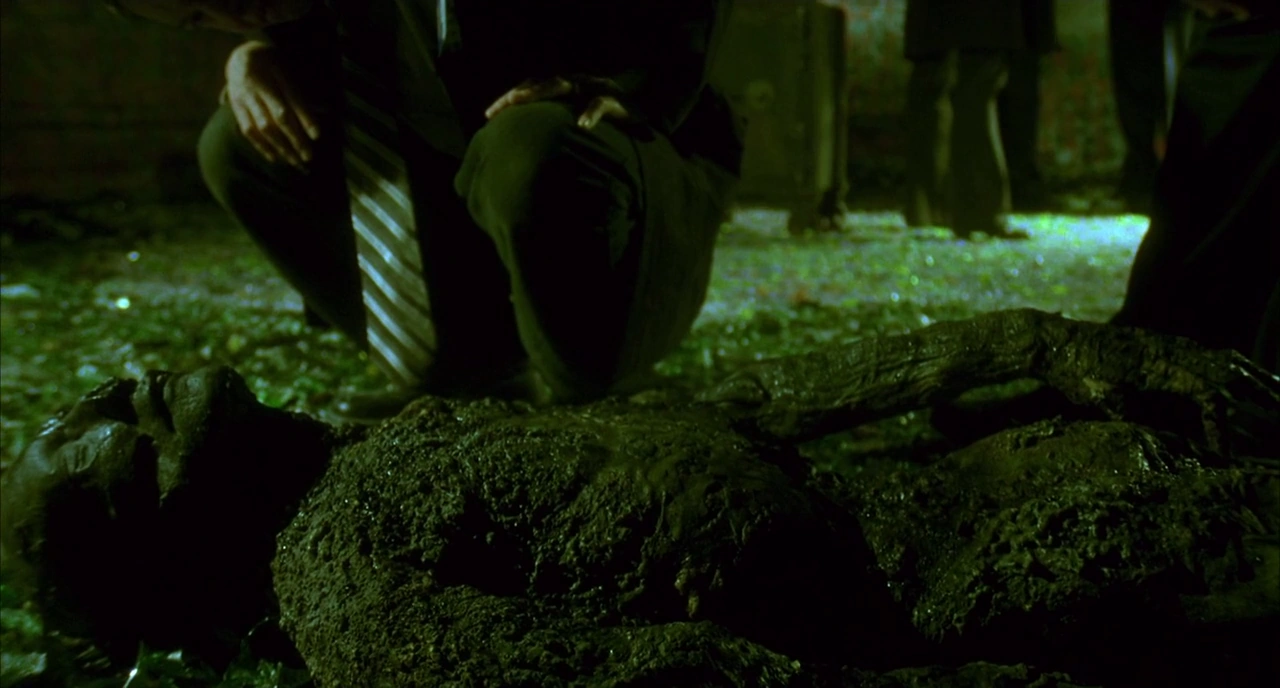
| + | [[File:MarkCharredRemains.png|thumb|left|250px|Mark's corpse]] |
||
| − | The crime scene was later found and investigated by [[Allison Kerry|Detective Allison Kerry]], [[David Tapp|Detective David Tapp]] and [[Steven Sing|Detective Steven Sing]] Thereby, Kerry discovered the peephole. Additionally, she also found a penlight, which Tapp ordered to be examined for fingerprints. Mark's corpse was taken to the [[Police Station|morgue]] for his autopsy by [[Adam Heffner|Dr. Adam Heffner]], while the safe with the antidote was taken to the evidence room. (''[[Saw]]'', ''[[Saw VI|VI]]'') |
||
| + | The next day, Mark's corpse was found by the [[Metropolitan Police Department]]. When the leading investigator on the Jigsaw case, [[David Tapp|Detective David Tapp]], and his partners, [[Steven Sing|Detective Steven Sing]] and [[Allison Kerry|Detective Allison Kerry]], examined the crime scene, Kerry found a penlight, which had been placed there by Detective Hoffman to lay a false trail. Furthermore, she discovered a [[Peepholes|peephole]] in one of the walls, which had been used to witness Mark's game from the outside. His corpse was eventually taken to the [[Police Station|morgue]], where [[Adam Heffner|Dr. Adam Heffner]] performed the autopsy on his body. (''[[Saw]]'', ''[[Saw VI|VI]]'') |
||
==Trivia== |
==Trivia== |
||
| − | *In the scene where Mark tries to find the combination, |
+ | *In the scene where Mark tries to find the combination, actor Paul Gutrecht can be seen wearing shoes as a protection from the glass shards. |
| − | *It was never explained how Mark was supposed to find out the real numbers. It is possible that the correct numbers were written with a special color, which would only become visible if it was very close to a source of |
+ | *It was never explained how Mark was supposed to find out the real numbers. It is possible that the correct numbers were written with a special color, which would only become visible if it was very close to a source of heat, such as the burning candle. |
*Other theories suggest that Mark had to find a pattern in the numerical sequences or that he had to try out the various combinations by simply using the trial and error method. |
*Other theories suggest that Mark had to find a pattern in the numerical sequences or that he had to try out the various combinations by simply using the trial and error method. |
||
Revision as of 15:14, 28 January 2019
| ◄ | Razor Wire Maze | Flammable Jelly | Reverse Beartrap | ► |
| “ | Let's put your so called illness to the test. | ” |
— Jigsaw's tape for Mark Wilson[src]
| ||
The Flammable Jelly is a trap from the Saw franchise, appearing in the first Saw film.
Design and Function
This game took place in a dark room, only lightened by a small candle. The victim was completely naked and had a flammable substance smeared on their body, as well as a slow-acting poison coursing through their bloodstream. The only antidote was hidden inside a heavy safe in the middle of the room. In order to open it, the victim had to find the right combination among hundreds of numbers written all over the walls. Due to the darkness, the victim was forced to take the candle and walk to the walls to be able to see the numbers, while the entire floor of the room was covered in glass shards. (Saw)
History
Mark Wilson's Test
| “ | Hello, Mark. If you're so sick, then why do I have so many photos of you up and about? Let's put your so called illness to the test. Right now there is a slow acting poison in your veins. The antidote is inside the safe. The combination to the safe is written on the walls. Hurry up and program it in, but watch your step. And by the way, that's a flammable substance smeared on your body, so I would be careful with that candle if I were you, or all the people you've burned with your act just might have their revenge. | ” |
— Mark Wilson's tape[src]
| ||

Mark awakes in his trap
The victim of this trap was Mark Wilson, a man who had defrauded his health insurance company of money by claiming he was seriously ill, even though he actually wasn't. Therefore, he was targeted by John Kramer, better known as the Jigsaw Killer, and his accomplice, Detective Mark Hoffman, who abducted him and took him to a pitch-dark room. When he woke up, Mark found himself completely naked in a dark room only lightened by a single candle. An audio tape left for him by Hoffman told him about a slow-acting poison in his body. The antidote for said poison was inside a safe right before him. However, in order to open it, he had to find the combination among hundreds of numbers written all over the walls. Due to the darkness, Mark had to take the candle with him and was forced to walk to the walls, while the entire floor of the room was covered in glass shards. Additionally, he had a flammable substance smeared on his body. Mark tried to find the combination in time before the poison could kill him, but thereby accidentally ignited the substance, causing him to burn alive. At the same time, Hoffman was witnessed his game through a peephole in the wall. (Saw, V)
Aftermath
Mark's corpse
The next day, Mark's corpse was found by the Metropolitan Police Department. When the leading investigator on the Jigsaw case, Detective David Tapp, and his partners, Detective Steven Sing and Detective Allison Kerry, examined the crime scene, Kerry found a penlight, which had been placed there by Detective Hoffman to lay a false trail. Furthermore, she discovered a peephole in one of the walls, which had been used to witness Mark's game from the outside. His corpse was eventually taken to the morgue, where Dr. Adam Heffner performed the autopsy on his body. (Saw, VI)
Trivia
- In the scene where Mark tries to find the combination, actor Paul Gutrecht can be seen wearing shoes as a protection from the glass shards.
- It was never explained how Mark was supposed to find out the real numbers. It is possible that the correct numbers were written with a special color, which would only become visible if it was very close to a source of heat, such as the burning candle.
- Other theories suggest that Mark had to find a pattern in the numerical sequences or that he had to try out the various combinations by simply using the trial and error method.