Tag: sourceedit |
No edit summary |
||
| (12 intermediate revisions by 5 users not shown) | |||
| Line 1: | Line 1: | ||
| − | This |
+ | This category contains a list of all traps appearing in ''[[Saw IV]]''. |
| − | == |
+ | ==[[Mausoleum|The Mausoleum]]== |
| − | [[File: |
+ | [[File:Art'n'TrevorMausoleum.png|thumb|250px]] |
| + | The victims of this trap were [[Trevor]] and [[Art Blank (Movies)|Art Blank]]. It was located inside a mausoleum. The trap itself consisted of a large, heavy metal contraption positioned in the middle of the room. In the center of the contraption was a winch with a long metal chain going through it. This chain was on both ends attached to two shackles around Art and Trevor's necks. If the chain was pulled on strong enough, a metal pin would be pulled out from the metal device and thereby activate it. After that, the winch would start to turn and would thereby pull the chained up victims to the center of the room where they'd ultimately be strangulated. Each of them had a different advantage in the game. On the side of the room where Trevor would wake up was a wooden box with several metallic tools which could be used as weapons, such as a hammer, a small axe and a hook. However, his eyes were sewn shut. Art, who was on the other side of the room, was able to see, but had his mouth shut and had no tools on his side. Due to their respective handicaps they were unable to communicate with each other in their attempt to get the key to their shackles, which was attached to the back of the shackle of the blinded Trevor. |
||
| − | A drug addict named [[Cecil Adams|Cecil]] was placed in what was referred to as the Knife Chair, later revealed to be Jigsaw's first created trap. He woke up with his arms bound to the armrests of a wooden chair, with blades jutting upwards into his forearms. A panel level with Cecil's face was connected to the arm restraints. Pushing it forward would have released the restraints and freed him. Jigsaw, who was present in the room, applied a large apparatus to the chair, consisting of eight blades enclosed around Cecil's head. Jigsaw then instructed Cecil in what to do, telling him that to release himself from the chair, he had to force his face through the blades to push the panel, matching his "internal ugliness" by scarring his face. Cecil, after sitting and screaming for help, began pushing his face through the knives while Jigsaw watched; however, before Cecil could complete his test, the faulty chair collapsed. Standing up, with the restraints still lodged in his arms, Cecil threatened to kill John, and lunged at him. Jigsaw side-stepped, causing Cecil to fall into a pile of hanging razor wire, where Jigsaw left him to die. |
||
| − | == |
+ | ==[[Rigg's Trial]]== |
| + | [[File:DanielRiggTestHD.png|thumb|left|250px]] |
||
| − | [[File:8.jpg|thumb|Art and Trevor fight for survival.]][[Trevor]], woke up on the floor of a mausoleum with a locked collar around his neck, attached to a chain. He began to panic when he realized that his eyes had been sewn shut, rendering him blind. He started pulling on the chain to try to release himself, waking up another victim, [[Art Blank]], on the other side of the room. Art realized that he was shackled by a similar collar to the opposite end of the same chain. Art's mouth had been sewn shut, rendering him mute. Between the two of them was a winding drum, with a trigger-tab in place inside of a large cylinder that the chain passed through. During Trevor and Art's ensuing struggle, Trevor knocked over a chair with multiple instruments on it, including a hammer, an axe, and multiple meat-hooks. As he began pulling on the chain, drawing Art closer to the machine, the tab was pulled out, activating the device. The cylinder began to rotate, slowly reeling in the chain and pulling both men closer together. They both pulled back and forth on the chain, each getting closer to the machine, though the lack of communication made it impossible for them to work together in solving the puzzle. Art spotted a key on the back of Trevor's collar and realized that it might open the collar around his own neck, unknown to him that it would also unlock Trevor's collar as well. Due to Trevor's loss of eyesight and Art's inability to speak, Trevor assumed that Art was an enemy and began attacking him as he made his way over to Trevor. Art armed himself with the axe to protect himself before the two men started fighting. Trevor swung a hook wildly, eventually stabbing Art in the leg. Art, however, still managed to get the key from the back of Trevor's collar after stabbing the hook into his shoulder. As Art attempted to unlock his collar, Trevor attacked again, and Art was forced to kill him by smashing his head in with the hammer. Finally, Art fumbled to try to open the lock on his collar. He managed to remove it, and screamed, ripping his mouth open. |
||
| + | The victim of this trap was [[Daniel Rigg|Officer Daniel Rigg]]. He woke up trapped inside the bathroom of his own [[Daniel Rigg's Apartment|apartment]]. Within 90 minutes, he had to face a series of tests all around the city in order to overcome his obsession with saving everyone around him. Thereby, he was led to believe that within these 90 minutes, he had to save his partners, [[Eric Matthews|Detective Eric Matthews]] and [[Mark Hoffman|Detective Mark Hoffman]]. In fact however, his tests were designed to convince him not to save anyone but rather to let them save themselves. After each test, he found a clue leading to the location of the next part of his game. |
||
| − | == |
+ | ===[[Scalping Seat|The Scalping Seat]]=== |
| − | [[File: |
+ | [[File:10.jpg|thumb|250px]] |
| + | The victim of this trap was [[Brenda]]. It was the first part of Daniel Rigg's trial. Brenda was chained to some sort of a mechanic chair in the middle of the living room of Rigg's apartment. This chair consisted of a seat, which was mounted onto a heavy machine with an exposed gear system. Brenda's chains were secured by a combination lock. Additionally, her hair was put through a metal lug and then tied up to a small metal axis. She also had one of Jigsaw's [[Pig Mask|pig masks]] on her face. It was Officer Rigg's task to leave her behind and just continue his way to his next test. However, if he decided to try to free Brenda and removed the mask, a metal pin connected to this mask would be pulled out of the machine. This would activate the gear system and therefore the axis. As it started to turn, it would slowly pull back Brenda's hair and subsequently tear out her scalp. The only way to escape the trap was to open the combination lock attached to her chain. Therefore, the necessary numbers had been written in the gears. As they weren't visible from her position, Rigg had to open the lock for her. Unknown to him, Brenda was tested as well and was tasked to kill him with a knife provided for her after Rigg saved her, as otherwise, Rigg would arrest her for her crimes due to several [[Stalker Photos|photos]] in the room, which prove that she was a criminal. |
||
| ⚫ | |||
| − | '''Tape:''' Hello Officer Rigg, welcome to your rebirth. For years, you have stood by and witnessed as your colleagues have fallen. You have remained untouched, while Eric Matthews has disappeared. But, with your survival became your obsession. Obsession to stop those around you from making the wrong choices, thus preventing you from making the right ones. You wanted to save everyone. Tonight, I will give you the opportunity to face your obsession. Look closely. Eric Matthews is still alive. The block of ice he stands upon is melting. He has but 90 minutes to save himself. Detective Hoffman's fate is linked to Eric's survival. Heed my warning Officer Rigg. Their lives hang in the balance of your obsession. Will you learn how to let go...and truly save them? The choice is yours. |
||
| ⚫ | |||
| + | The victim of this trap was [[Ivan Landsness]]. It was the second part of Daniel Rigg's trial. Rigg had to force Ivan into a trap located in room 261 at the [[Alexander Motel]] owned by Ivan. The trap consisted of a bed and four large metal columns positioned on each corner of it. These columns were mounted to heavy metal contraptions with gear systems. Attached to each of the columns was a chain with a shackle on its end. Rigg had to help Ivan to strap all four of his limbs. Additionally, another metal device, resembling a vise, was positioned at the headboard and was used to hold Ivan's head in place. On each side of the vise was a long miniature scythe. Before the start of the game, Rigg handed Ivan two triggers, one for each scythe. Once the game began, Ivan had 60 seconds to press both triggers, which would cause the scythes to gouge his eyes out. If he didn't accomplish his task in time, the metal columns would fall back one by one and thereby rip out his limbs. |
||
| − | === |
+ | ===[[Spike Trap|The Spike Trap]]=== |
| + | [[File:Classroom-trap-iv.jpg|thumb|250px]] |
||
| − | or '''"SEE WHAT I SEE"''' |
||
| + | The victims of this trap were [[Morgan]] and [[Rex]]. It was the third part of Daniel Rigg's trial and was located in a classroom at an [[Elementary School|elementary school]]. Morgan and Rex, each of them wearing a leather harness, were chained to a metal columns back to back. Both of their bodies were impaled by eight long, thin metal spikes. While the spikes only caused flesh wounds on Morgan's body, Rex was mortally wounded as each spike impaled one of his major arteries. In order to survive and to avoid bleeding to death, Morgan had to pull out all the spikes, which would inevitably result in Rex' death. Once the game had played out, Rigg had to give Morgan the key to free herself. |
||
| − | [[File:10.jpg|thumb|SEE WHAT I SEE (Brenda)]] |
||
| ⚫ | |||
| − | Rigg enters a room and the lights turn on, revealing a woman named [[Brenda]] who is chained to a chair and has her hair knotted to a gear, slowly pulling it until her scalp comes off. A TV turns on and Billy tells Rigg that she is a criminal and Rigg has the choice to save her. The gears start turning and Rigg scrambles to find a way to save her. He tries shooting at the gears, and the machine stalls only for a little until it starts back up. Rigg opens a drawer to find scissors to cut Brenda's hair, but there are none. He runs to the kitchen for a knife, but when he opens the knife drawer, there are also none. The only way to free Brenda is to unlock the combination lock on the back of the chair, and the combination numbers are on the gears. Riggs gets the numbers, puts in the combination, and frees Brenda with a severe wound in her scalp. He leaves the room to find some medical supplies and comes back to be attacked by Brenda with a butcher knife. Eventually taking her down, he plays a tape that was in her pocket that instructs her to kill Rigg as he's seen the photos of her crimes. |
||
| + | [[File:Saw4judgeasijudge.jpg|thumb|left|250px]] |
||
| + | The victim of this trap was Detective Eric Matthews. It was the fourth and final part of Daniel Rigg's trial and was located in a room inside the abandoned [[Gideon Meatpacking Plant]]. The trap itself consisted of a giant seesaw-like scale positioned in the middle of the room. Eric stood on top of a large ice block on one side of the scale and was held in place by a chain noose around his neck which was hanging from the ceiling. On the other side of the scale was an electric chair. Positioned around the ice block were several radiant heaters which slowly melt the ice. The melt water would then flow on the other side of the scale and thereby seemingly kill Detective Mark Hoffman, who was strapped to the chair, with an electric shock. However, the chair was in fact without any function and solely served the purpose to provide Hoffman, Jigsaw's accomplice, the possibility to play the role of another victim in order to be able to observe the game at close range. On the ceiling above them was a large metal contraption with two mechanical arms, which each held a large ice block. The contraption was connected with the room's only door via a long chain. If the door was opened, the arms would swing down. Thereby, the ice blocks would inevitably smash Eric's head. The trap could be deactivated with a single button. However, this only worked if the door remained closed for the duration of 90 minutes. |
||
| ⚫ | |||
| − | '''Rigg's Tape:''' Officer Rigg, your first test. The person in front of you is in desperate need of help. But it is not your job to save them. You view this person as a victim, but if you were to SEE WHAT I SEE, beneath the mask lies a criminal undeserving of the life she leads. Your obsession tells you to save the victim. I tell you to walk away. The choice is yours. |
||
| ⚫ | |||
| + | The victims of this trap were [[Lindsey Perez|Special Agent Lindsey Perez]] and [[Peter Strahm|Special Agent Peter Strahm]]. As they found out about Rigg's trial, they tried their best to find him and end the game before anyone else could die. Thereby, they were tested themselves by Jigsaw, who tried to convince them not to continue their investigations. At the location of one of Rigg's tests, Jigsaw had placed his mechanical [[Billy the Puppet|ventriloquist puppet]] as well as a message for Perez, which warned her that Strahm would soon take the life of an innocent man. In fact, the puppet was a trap on its own. If Perez approached it after receiving her message, its head would explode and thereby blow shrapnel at her face. Strahm's part of the test waited for him at the Gideon Meatpacking Plant, where Jigsaw's warning would come true as Strahm would be forced to shoot another victim, [[Jeff Denlon]], in self-defense and would be locked up in the same room. Afterwards, he'd quickly find a secret way leading him out, along with another message, which warned him not to go on and instead wait for reinforcements. If Strahm ignored the warning, he'd then be subdued and trappen in another [[Water Cube|device]], which was designed to drown him without giving him any way to escape. |
||
| + | ==[[Knife Chair|The Knife Chair]]== |
||
| − | '''Brenda's Tape:''' Hello Brenda. I want to play a game. An officer will try to save you. If he is successful, then your game begins. This man will use these photos to sentence you for your crimes and the only way to stop him is taped underneath the TV. Let him save your life and accept your fate to rot in prison...or kill him and guarantee your freedom. Make your choice. |
||
| + | [[File:Saw4knifechair.jpg|thumb|left|250px]] |
||
| + | The victim of this trap was [[Cecil Adams]]. It was located at the [[John Kramer's Workshop|workshop]] of [[John Kramer]], the Jigsaw Killer. The trap consisted of a wooden chair connected to two metallic contraptions. Attached to the armrests of the chair were blades which would cut Cecil's wrists. To prevent him from standing up, both arms and legs were fixated by metal shackles. These shackles were connected by several metal bars. The central bar was in a vertical position and had a small pressure plate attached to its upper end. This plate was positioned in front of the Cecil's face. In order to get free from the shackles, he had to press his face against the plate. However, there was another device which made this task rather difficult. This device consisted of eight knives, four on each side, which were horizontally positioned in front of Cecil's face. Therefore, he had to press his face through the knives in order to press the plate connected to the shackles. |
||
| − | == |
+ | ==[[Spine Cutters|The Spine Cutters]]== |
| + | [[File:Spine_Cutter.jpg|thumb|250px]] |
||
| − | or '''"FEEL WHAT I FEEL"''' |
||
| + | The victim of this trap was Art Blank. He was forced to wear this trap device, which was attached to his back with a leather harness. It was an elongated contraption with two pliers at its upper end. These pliers were aimed at Art's neck and would cut his spine if he didn't follow the orders given to him. Therefore, he had to built and set up the traps later used in Rigg's trial and also had to abduct the respective victims. Afterwards, he had to go to the Gideon Meatpacking Plant to the same room, where Eric Matthews and Mark Hoffman were imprisoned, and had to oversee them. If Rigg didn't enter the room within the following 90 minutes, Art could free himself and the others from their trap with a button. |
||
| ⚫ | |||
| ⚫ | |||
| − | The next test began as Rigg entered room 261 of the Alexander Motel, presumably owned by a man named Ivan Landsness. In the room, Rigg discovered a box with a picture of his wife, [[Tracy Rigg|Tracy]], sitting atop it. The back of the photo had a note for Rigg that read, "SHE NEEDED YOU". Looking at the box, Rigg noticed some long strands of hair sticking out of its side. Worried it may be his wife's head, he opens it, just to find the infamous pig mask used by Jigsaw and Amanda Young, a tape recorder, and a photo of [[Ivan Landsness]]. The tape told Rigg that he would need to grab Ivan, but to do so, he would have to conceal his identity from the motel cameras. To do this, Rigg put on the pig mask. Ivan knocked on the door, but was pulled in and ordered at gunpoint to enter the room opposite the one they were in, which had "FEEL WHAT I FEEL" scrawled on the door. In this room were several pictures of various dead women and a bed with four shackles connected to large posts propped upwards from the corners of the bed, each equipped with numerous chains connected to gears. Flashbacks later showed that a "G" was marked on one of the shackles. It was revealed by a video tape in the corner of the room that Ivan was a serial rapist, responsible for raping and torturing the women in the photos. The tape recorder instructed Rigg to force Ivan into the trap so that he could be tested. Rigg ordered Ivan to strap himself in on the bed, where Ivan's head was placed in a vise and his hands and feet were shackled. Rigg, after reading a card that instructed him to "hand him the tools that will save his life," supplied Ivan with two triggers. If Ivan activated both of them within one minute, two scythe-like arms attached to either side of the vise would drop down and gouge his eyes, as punishment for being a voyeur. Activating both of them would blind Ivan, but would deactivate the rest of the device, and he would leave with his life. Rigg then left Ivan in the room to complete his test. Ivan only managed to blind himself in one of his eyes, but failing to press the second trigger in time. As a result, the gears connected to the posts began to crank, as the four posts were pulled and planted outwards, pulling Ivan's limbs and ripping them from his body. |
||
| + | [[File:Hoffman IV.jpg|thumb|left|250px]] |
||
| − | |||
| + | Before his death, John Kramer swallowed a wax-coated audio tape, which was later going to be found in his stomach during his autopsy. This tape contained a warning for Mark Hoffman, who was going to continue the games after John's games, and told him that he'd soon be tested as well. Meanwhile, John's ex-wife, [[Jill Tuck]], received a [[Jill's Box|box]], which contained a mechanical contraption, a so-called [[Reverse Beartrap]], which she had to use to test Hoffman. The trap was supposed to be locked onto his head. The frontal part of the trap was hooked into his upper and his lower jaw. Once the game began, the trap would burst open and thereby rip his face apart if he wasn't able to free himself within a short time. |
||
| − | '''Rigg's First Tape''': "Hello, officer Rigg, in order for you to fully understant my way, you must...FEEL WHAT I FEEL. The photo before you is of a man is desperate need your help. In the next room are the tools to his salvation. His life is in your hands but in the end, only he can save himself. Be carefull. There are cameras... watching... and you must hide your identify. Make your choice." |
||
| − | |||
| − | '''Rigg's Second Tape:''' "If you are playing this tape, then you are one step closer to truly understanding how to save a life. As an officer of the law, you find yourself torn. Is the man before you a victim or a perpetrator of violence? His salvation is out of your hands. It is your choice if you wish to put it into his own. Once this lesson is learned, you will find yourself one step closer to truly saving Eric Matthews. Without you, this man's game cannot begin. Force him into the position to face his demons and let him make the decision." |
||
| − | |||
| − | '''Ivan's Tape:''' "Hello, Ivan. As a voyeur, you have kept photos of those you have victimized. Can you see the pain you have brought them? You have torn apart their lives. You've used your body as an instrument of abuse. Now I give you the chance to decide what is more important: Your eyes, which have led you blindly astray.. or your body, which has caused those around you endless suffering. You have been handed the tools which will save your life. Decide quickly, though. In 10 seconds, the choice will be made for you." |
||
| − | |||
| ⚫ | |||
| − | or "'''SAVE AS I SAVE'''" |
||
| − | |||
| − | Officer Rigg continues to an abandoned school once owned by Art Blank. Before reaching the classroom, Rigg passes by the destroyed room [[Troy]] was killed in. Rigg then spots a door with a red question mark on it. Inside, he finds [[Morgan and Rex|Rex]] and [[Morgan and Rex|Morgan]]. Rex is Morgan's abusive husband who denies allegations. Morgan is too scared to testify against Rex, so Rigg takes his anger out on him by punching him in the face. He finds them bound onto a pole by chains, with one pole still connecting them. On the classroom chalkboard says the words 'Save as I Save.' Rex appears to be dead from severed arteries and major blood loss, while Morgan is rendered unconscious from slight blood loss. She then awakes, startling Rigg. She then recalls what happened. She remembers waking up with many spikes impaled throughout her body and a tape recorder chained to her hand. Jigsaw insists Morgan to 'break the ties that bind,' meaning she needed to remove the poles, or she would die. On an overhead projecter were x-ray films of broken bones. Various charts around the room show where the spikes are in their bodies. Morgan, who just suffered flesh wounds, will live. However, the spikes in Rex's body are puncturing major arteries, so he will die of blood loss. Morgan ends up pulling all of the spikes except for one. (In the Director's Cut, it shows Rigg assisting her pulling it out). Rigg spots a tape recorder on a nearby cart. Jigsaw explains to Rigg that only Morgan could save herself, and Rigg holds the key to her salvation. Behind the projector screen, Rigg spots a clue box. Inside it, there is a photo of Tracy, and on the back reads 'Go Home.' Using his knowledge as a police officer, the 'G' in 'Go Home' is identical to the one on the butcher knife in Rigg's apartment, and one of Ivan's shackles. Also in the box there is a key. He instinctively gives it to Morgan, and he makes his way to the Gideon Meat Packing Plant. On his way out, Rigg notifies law enforcement by setting off a fire alarm. |
||
| − | |||
| − | '''Morgan's Tape:''' "The human body is a fascinating organism. It can withstand the most brutal injury... and yet repair itself miraculously. But you know this all too well. How many broken bones have you suffered at the hands of your husband? How many flesh wounds have you endured? With time, the bruises have healed, but your pain has not. Today, I empower you to take control of your life. Can you disconnect from the one thing that has brought you and others so much pain? With time, your wounds will heal. His, however, will not. Remove the ties that bind... or bleed to death from your inactivity. The choice is yours." |
||
| − | |||
| − | '''Rigg's Tape:''' "Hello, Officer Rigg. What have you learned thus far? Experience is a harsh teacher. First comes the test, second comes the lesson. If you are to SAVE AS I SAVE, then you will see this person before you is but a student. So I ask you, Officer Rigg: Has the pupil learned her lesson? Has she been told the error for her ways? Does she now view the world differently? Officer Rigg, the key to this person's freedom lies in the palm of your hand, but only after she has done her own part. Can you play your role in her salvation? Once judgement has been made, though, the key to finding your next destination is just off the map." |
||
| − | |||
| ⚫ | |||
| − | or '''"JUDGE AS I JUDGE"''' |
||
| − | |||
| − | [[Eric Matthews|Detective Mathews]] was standing on a block of ice holding a revolver waiting for the 90 minute timer to end. |
||
| − | |||
| − | It is revealed that two ice blocks are suspended above the detective, each on a large swing arm, which, when released, would cause the blocks to swing down, crushing the detective's head between them. |
||
| − | |||
| − | Officer Riggs opens the door causing the two ice blocks to smash his head, resulting in his death. |
||
| − | |||
| − | '''Tape:''' Hello, Officer Rigg. If you are hearing this, then you have reached Detective Matthews and Detective Hoffman in under 90 minutes, resulting in their deaths. The rules are clear. You were warned. They had to save themselves. Their salvation was out of your hands. Time was on your side but your obsession wouldn't let you wait. Instead of saving Detective Matthews, you cost him his life. You failed your final test. |
||
| − | |||
| ⚫ | |||
| ⚫ | |||
| − | Before her death, Detective Allison Kerry kept in contact with special agents [[Lindsey Perez]] and [[Peter Strahm]], giving them the info she had obtained concerning the Jigsaw case. In Kerry's last message, she had informed them that two officers might be in danger, while supplying the agents with a key and another hint, "open the door and you'll find me". Strahm and Perez joined the investigation with Detective Hoffman after the discovery of Kerry's corpse, withholding some of the info Kerry had given them from Hoffman. They were then led to believe that the two officers in danger were Lieutenant Rigg and Hoffman, after the two disappeared. Learning of Rigg's tests, the two agents arrived at Rigg's apartment, where they found Brenda's corpse, along with a message on the wall and some pictures that led them to Jill Tuck, Jigsaw's ex-wife. While questioning her on the side about her ex-husband, Perez and Strahm followed after Rigg, realizing that he was either being set-up to look like an accomplice of Jigsaw's, being recruited, or was in fact an apprentice. After arriving at Rigg's FEEL WHAT I FEEL test, they learned that the room that Ivan had been killed in was being rented, for the past six days, by a man named Art Blank, who had been missing for two weeks. Learning of more properties owned by him, they arrived at the most recent residence owned by Art. There, the two agents found two folders, one that repeated the message they had already received, "OPEN THE DOOR AND YOU'LL FIND ME" (intended for Strahm), while the second read, "YOU ARE IN DANGER OF GETTING TOO CLOSE... STEP BACK" (a hint for Perez). After tearing a camera from the wall, Strahm deduced that he and Perez were in fact the two officers in danger. While waiting for the address of the last of Art's owned buildings (believing it to be Jigsaw's lair or the location of Rigg's last game), Perez and Strahm arrived at the scene of Rigg's SAVE AS I SAVE test. After learning that the building they were in, an abandoned school, was in fact the last owned by Art (who shared ownership with one of his clients, Jill Tuck), Strahm and Perez checked the school office, where a Billy puppet sat in a chair surrounded by candles with a tape recorder around the puppet's neck. Perez pressed the play button and heard a message intended for her. It informed her that her partner was going to kill an innocent man (later revealed to be Jeff Denlon), and that her "next move [was] critical," hinting that she should get out of the way. The puppet's eyes began to turn as a faint recording of Jigsaw's voice began playing, and Perez leaned forward to hear what it was saying. The puppet's face then exploded, sending shrapnel into her face and neck while letting off its mocking laugh, which began to slow down and stop from the damage done to the puppet. |
||
| − | |||
| − | '''Tape:''' "Hello, Agent Perez and welcome to the world you have long studied. Your partner Agent Strahm will soon take the life of an innocent man. Heed my warning, Agent Perez. Your next move is critical." |
||
| − | |||
| ⚫ | |||
| − | [[File:Hoffman_IV.jpg|thumb|Hoffman listening to the tape]] |
||
| − | A wax-coated tape in Jigsaw's stomach was found during his autopsy. At first, it was thought to be a message that taunted the authorities, but as the movie progressed, it was revealed that John had a second apprentice besides Amanda. The second apprentice was revealed to be Hoffman when the film neared its conclusion, and the tape found in Jigsaw's stomach was intended for him. It stated that though he may be the "last man standing" (since Jigsaw and Amanda were both dead at the time the tape was played), he would not walk away untested, that "the games have just begun", possibly hinting that the tape was a prelude to Hoffman's testing. This warning would be realized in Saw VI, as Jill Tuck placed Hoffman in '''The Reverse Beartrap 2.0''', carrying out Jigsaw's last request. |
||
| − | |||
| − | '''Tape:''' Are you there, Detective? If so, you are probably the last man standing. Now, perhaps you will succeed where the others have failed. You think you will walk away untested? I promise that my work will continue. You think it is over just because I'm dead? It's not over. The games have just begun. |
||
---- |
---- |
||
| + | [[Category:Traps]] |
||
Revision as of 16:46, 23 February 2020
This category contains a list of all traps appearing in Saw IV.
The Mausoleum
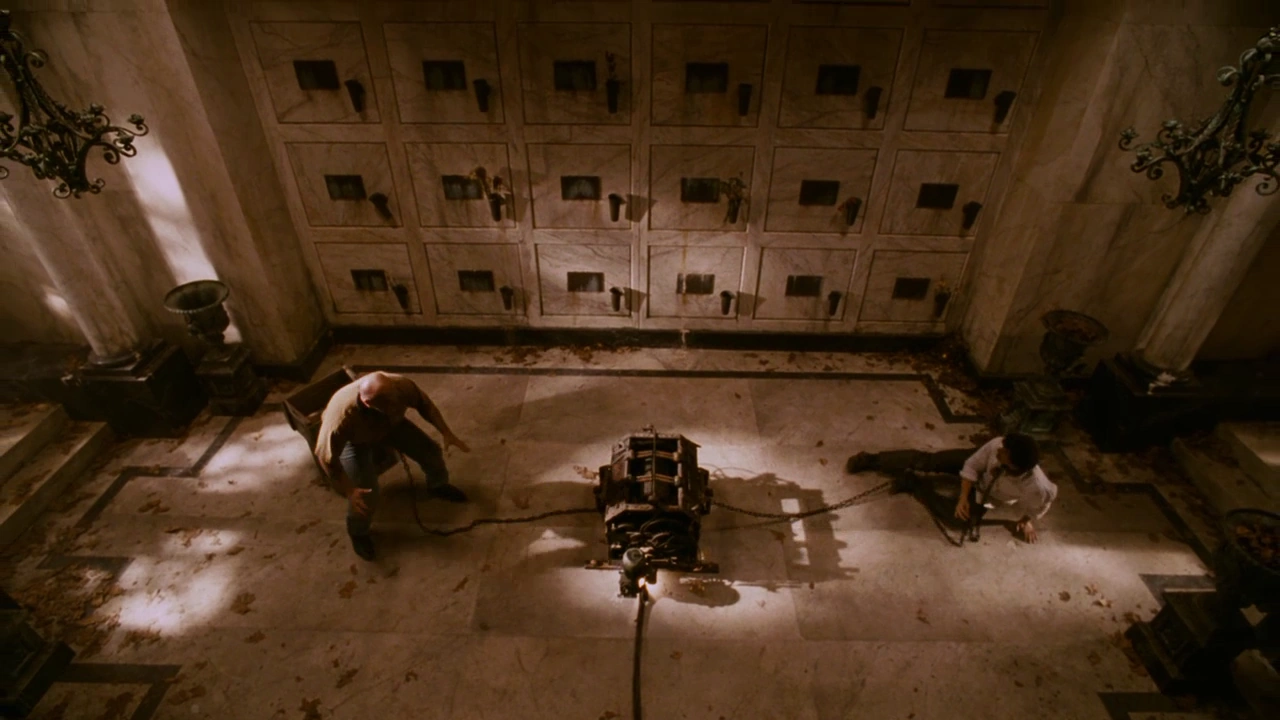
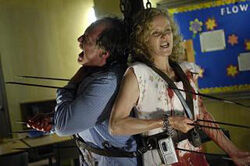
The victims of this trap were Trevor and Art Blank. It was located inside a mausoleum. The trap itself consisted of a large, heavy metal contraption positioned in the middle of the room. In the center of the contraption was a winch with a long metal chain going through it. This chain was on both ends attached to two shackles around Art and Trevor's necks. If the chain was pulled on strong enough, a metal pin would be pulled out from the metal device and thereby activate it. After that, the winch would start to turn and would thereby pull the chained up victims to the center of the room where they'd ultimately be strangulated. Each of them had a different advantage in the game. On the side of the room where Trevor would wake up was a wooden box with several metallic tools which could be used as weapons, such as a hammer, a small axe and a hook. However, his eyes were sewn shut. Art, who was on the other side of the room, was able to see, but had his mouth shut and had no tools on his side. Due to their respective handicaps they were unable to communicate with each other in their attempt to get the key to their shackles, which was attached to the back of the shackle of the blinded Trevor.
Rigg's Trial
The victim of this trap was Officer Daniel Rigg. He woke up trapped inside the bathroom of his own apartment. Within 90 minutes, he had to face a series of tests all around the city in order to overcome his obsession with saving everyone around him. Thereby, he was led to believe that within these 90 minutes, he had to save his partners, Detective Eric Matthews and Detective Mark Hoffman. In fact however, his tests were designed to convince him not to save anyone but rather to let them save themselves. After each test, he found a clue leading to the location of the next part of his game.
The Scalping Seat
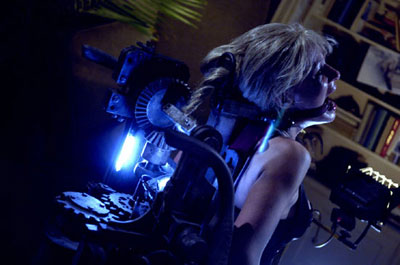
The victim of this trap was Brenda. It was the first part of Daniel Rigg's trial. Brenda was chained to some sort of a mechanic chair in the middle of the living room of Rigg's apartment. This chair consisted of a seat, which was mounted onto a heavy machine with an exposed gear system. Brenda's chains were secured by a combination lock. Additionally, her hair was put through a metal lug and then tied up to a small metal axis. She also had one of Jigsaw's pig masks on her face. It was Officer Rigg's task to leave her behind and just continue his way to his next test. However, if he decided to try to free Brenda and removed the mask, a metal pin connected to this mask would be pulled out of the machine. This would activate the gear system and therefore the axis. As it started to turn, it would slowly pull back Brenda's hair and subsequently tear out her scalp. The only way to escape the trap was to open the combination lock attached to her chain. Therefore, the necessary numbers had been written in the gears. As they weren't visible from her position, Rigg had to open the lock for her. Unknown to him, Brenda was tested as well and was tasked to kill him with a knife provided for her after Rigg saved her, as otherwise, Rigg would arrest her for her crimes due to several photos in the room, which prove that she was a criminal.
The Bedroom Trap


The victim of this trap was Ivan Landsness. It was the second part of Daniel Rigg's trial. Rigg had to force Ivan into a trap located in room 261 at the Alexander Motel owned by Ivan. The trap consisted of a bed and four large metal columns positioned on each corner of it. These columns were mounted to heavy metal contraptions with gear systems. Attached to each of the columns was a chain with a shackle on its end. Rigg had to help Ivan to strap all four of his limbs. Additionally, another metal device, resembling a vise, was positioned at the headboard and was used to hold Ivan's head in place. On each side of the vise was a long miniature scythe. Before the start of the game, Rigg handed Ivan two triggers, one for each scythe. Once the game began, Ivan had 60 seconds to press both triggers, which would cause the scythes to gouge his eyes out. If he didn't accomplish his task in time, the metal columns would fall back one by one and thereby rip out his limbs.
The Spike Trap
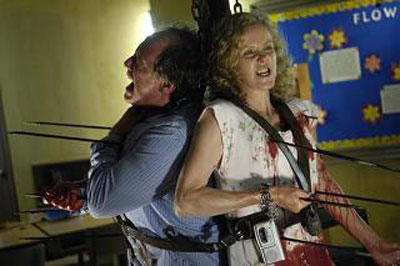
The victims of this trap were Morgan and Rex. It was the third part of Daniel Rigg's trial and was located in a classroom at an elementary school. Morgan and Rex, each of them wearing a leather harness, were chained to a metal columns back to back. Both of their bodies were impaled by eight long, thin metal spikes. While the spikes only caused flesh wounds on Morgan's body, Rex was mortally wounded as each spike impaled one of his major arteries. In order to survive and to avoid bleeding to death, Morgan had to pull out all the spikes, which would inevitably result in Rex' death. Once the game had played out, Rigg had to give Morgan the key to free herself.
The Ice Block Trap
The victim of this trap was Detective Eric Matthews. It was the fourth and final part of Daniel Rigg's trial and was located in a room inside the abandoned Gideon Meatpacking Plant. The trap itself consisted of a giant seesaw-like scale positioned in the middle of the room. Eric stood on top of a large ice block on one side of the scale and was held in place by a chain noose around his neck which was hanging from the ceiling. On the other side of the scale was an electric chair. Positioned around the ice block were several radiant heaters which slowly melt the ice. The melt water would then flow on the other side of the scale and thereby seemingly kill Detective Mark Hoffman, who was strapped to the chair, with an electric shock. However, the chair was in fact without any function and solely served the purpose to provide Hoffman, Jigsaw's accomplice, the possibility to play the role of another victim in order to be able to observe the game at close range. On the ceiling above them was a large metal contraption with two mechanical arms, which each held a large ice block. The contraption was connected with the room's only door via a long chain. If the door was opened, the arms would swing down. Thereby, the ice blocks would inevitably smash Eric's head. The trap could be deactivated with a single button. However, this only worked if the door remained closed for the duration of 90 minutes.
Perez and Strahm's Trial


The victims of this trap were Special Agent Lindsey Perez and Special Agent Peter Strahm. As they found out about Rigg's trial, they tried their best to find him and end the game before anyone else could die. Thereby, they were tested themselves by Jigsaw, who tried to convince them not to continue their investigations. At the location of one of Rigg's tests, Jigsaw had placed his mechanical ventriloquist puppet as well as a message for Perez, which warned her that Strahm would soon take the life of an innocent man. In fact, the puppet was a trap on its own. If Perez approached it after receiving her message, its head would explode and thereby blow shrapnel at her face. Strahm's part of the test waited for him at the Gideon Meatpacking Plant, where Jigsaw's warning would come true as Strahm would be forced to shoot another victim, Jeff Denlon, in self-defense and would be locked up in the same room. Afterwards, he'd quickly find a secret way leading him out, along with another message, which warned him not to go on and instead wait for reinforcements. If Strahm ignored the warning, he'd then be subdued and trappen in another device, which was designed to drown him without giving him any way to escape.
The Knife Chair
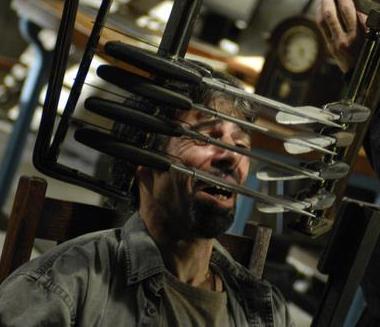
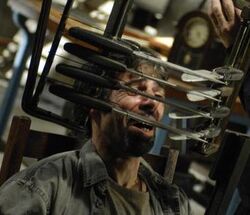
The victim of this trap was Cecil Adams. It was located at the workshop of John Kramer, the Jigsaw Killer. The trap consisted of a wooden chair connected to two metallic contraptions. Attached to the armrests of the chair were blades which would cut Cecil's wrists. To prevent him from standing up, both arms and legs were fixated by metal shackles. These shackles were connected by several metal bars. The central bar was in a vertical position and had a small pressure plate attached to its upper end. This plate was positioned in front of the Cecil's face. In order to get free from the shackles, he had to press his face against the plate. However, there was another device which made this task rather difficult. This device consisted of eight knives, four on each side, which were horizontally positioned in front of Cecil's face. Therefore, he had to press his face through the knives in order to press the plate connected to the shackles.
The Spine Cutters
The victim of this trap was Art Blank. He was forced to wear this trap device, which was attached to his back with a leather harness. It was an elongated contraption with two pliers at its upper end. These pliers were aimed at Art's neck and would cut his spine if he didn't follow the orders given to him. Therefore, he had to built and set up the traps later used in Rigg's trial and also had to abduct the respective victims. Afterwards, he had to go to the Gideon Meatpacking Plant to the same room, where Eric Matthews and Mark Hoffman were imprisoned, and had to oversee them. If Rigg didn't enter the room within the following 90 minutes, Art could free himself and the others from their trap with a button.
Hoffman's Test

Before his death, John Kramer swallowed a wax-coated audio tape, which was later going to be found in his stomach during his autopsy. This tape contained a warning for Mark Hoffman, who was going to continue the games after John's games, and told him that he'd soon be tested as well. Meanwhile, John's ex-wife, Jill Tuck, received a box, which contained a mechanical contraption, a so-called Reverse Beartrap, which she had to use to test Hoffman. The trap was supposed to be locked onto his head. The frontal part of the trap was hooked into his upper and his lower jaw. Once the game began, the trap would burst open and thereby rip his face apart if he wasn't able to free himself within a short time.
-
Bedroom Trap -

Mausoleum -
Ice Block Trap -
Scalping Seat -
Spine Cutters -
Spike Trap -
Knife Chair -
Rigg's Trial
All items (11)


.jpeg)